Category Archives: Proton SDK

Relating to my C++ mobile focused open source cross platform development framework

Universal Game Translator – Using Google’s Cloud Vision API to live-translate Japanese games played on original consoles (try UGM yourself!)


In a hurry? Download link for the program is here.  Edit config_template.txt for directions on setup, it’s kind of tricky.  Only runs on Windows right now.  (Github source)

Why I wanted a “translate anything on the screen” button

I’m a retro gaming nut.  I love consuming books, blogs, and podcasts about gaming history.  The cherry on top is being able to experience the identical game, bit for bit, on original hardware.  It’s like time traveling to the 80s.

Living in Japan means it’s quite hard to get my hands on certain things (good luck finding a local Speccy or Apple IIe for sale) but easy and cheap to score retro Japanese games.

Yahoo Auction is kind of the ebay of Japan.  There are great deals around if you know how to search for ’em.  I get a kick out of going through old random games, I have boxes and boxes of them.  It’s a horrible hobby for someone living in a tiny apartment.

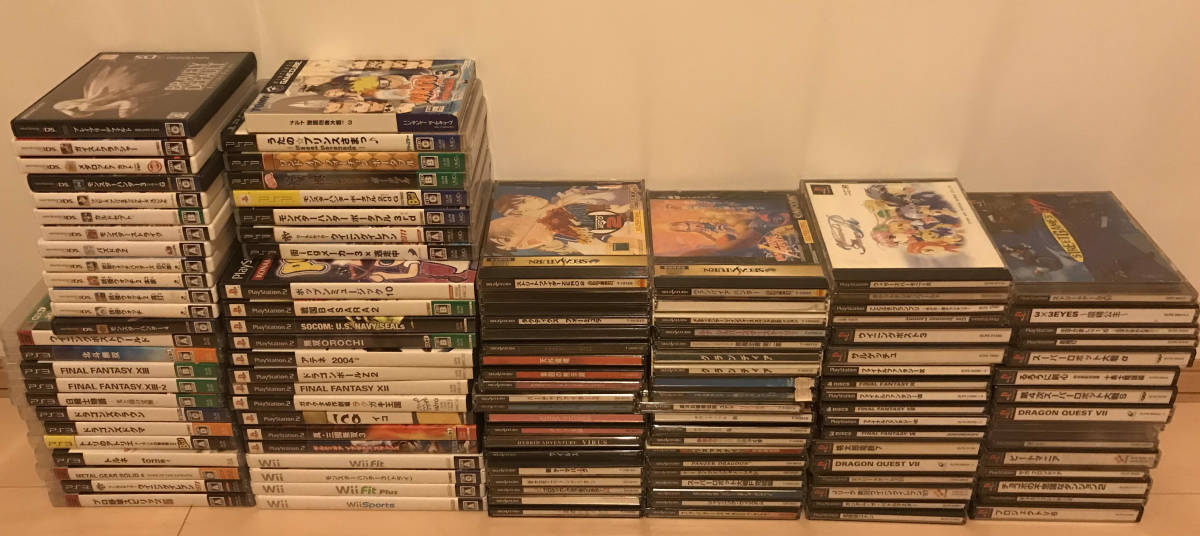
Example haul – I got everything in this picture for $25 US! Well, plus another $11 for shipping.

There is one obvious problem, however

It’s all in Japanese.  Despite living here over fifteen years, my Japanese reading skills are not great. (don’t judge me!) I messed around with using Google Translate on my phone to help out, but that’s annoying and slow to try to use for games.

Why isn’t there a Google Translate for the PC?!

I tried a couple utilities out there that might have worked for at least emulator content on the desktop, but they all had problems.  Font issues, weak OCR, and nothing built to work on an agnostic HDMI signal so I could do live translation while playing on real game consoles.

So I wrote something to do the job called UGT (Universal Game Translator) – you can download it near the bottom of this post if you want to try it.

Here’s what it does:

  • Snaps a picture from the screen or HDMI signal, sends it to google to be analyzed for text in any language
  • Studies the layout and decides which text is dialog and which bits should be translated “line by line”
  • Overlays the frozen frame and translations over the gameplay
  • Allows copy/pasting the translated or original language or looking up a kanji by clicking on it
  • Can translate any language to any language without needing any local data as Google is doing all the work, can handle rendering Japanese, Chinese, Korean, etc.  Different fonts are automatically used for different languages (configuration in font.txt)
  • Controlled by hotkeys or a gamepad
  • Can read the dialog out loud in either the original or translated language
  • Can drag a rectangle to only translate a small area (Ctrl-F10 by default)

In the video above, you’ll notice some translated text is white and some is green.  The green text means it is being treated as “dialog” using its weighting system to decide what is/isn’t dialog.

If a section isn’t determined to be dialog, “Line by line” is used.  For example, options on a menu shouldn’t be translated all together (Run Attack Use Item), but little pieces separately like “Run”, “Attack”, “Use item” and overlaid exactly over the original positions.  If translated as dialog, it would look and read very badly.

Here are how my physical cables/boxes are setup for “camera mode”. (Not required, desktop mode doesn’t need any of this, but I’ll talk about that later)

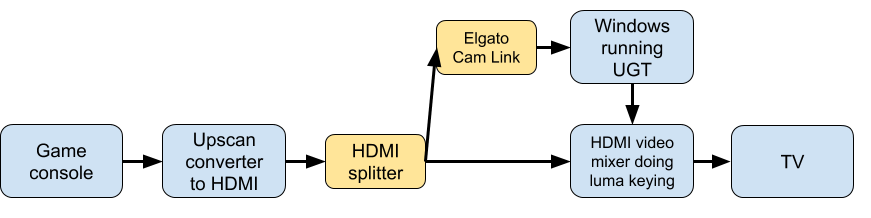
Happy with how merging two video signals worked with a Roland V-02HD on the PlayStep project, I used a similar method here too.  I’m doing luma keying instead of chroma as I can’t really avoid green here. I modify the captured image slightly so the luma is high enough to not be transparent in the overlay. (of course the non-modified version is sent to Google)

This setup uses the windows camera interface to pull HDMI video (using Escapi by Jari Komppa) to create screenshots that it sends to Google.  I’m using an Elgato Cam Link for the HDMI input.

Anyway, for 99.99999999% of people this is setup is overkill as they are probably just using an emulator on the same computer, which is why the default is “desktop mode” that just lets you use hotkeys (default is  Ctrl-F12) to translate the active Window. It’s just like having Google Translate on your PC.  You can also use Ctrl-F10 to drag a rectangle to translate, and using Ctrl-F12 after that will remember that rect position/size.

Here’s desktop mode in action, translating a JRPG being played on a PC Engine/TurboGrafx 16 via emulation. It shows how you can copy/paste the recognized text if want as well, useful for kanji study, or getting text read to you.  You can click a kanji in the game to look it up as well.

Try it yourself

Before you download:

  • Machine translation is not great (but getting better) – this is no way replaces the work of real translators
  • You need to rename config_template.txt to config.txt and edit it
  • You need to enter your Google Vision API key in the config.txt.  This is a hassle but it’s how Google stops people from abusing their service
  • Also, you’ll need to enable the Translation API
  • Google charges money for using their services after you hit a certain limit. I’ve never actually had to pay anything, but be careful.
  • This is not polished software and should be considered experimental meant for computer savvy users
  • Privacy warning: Every time you translate you’re sending the image to google to analyze.  This also could mean a lot of bandwidth is used, depending how many times you click the translate button.  Ctrl-12 sends the active window only, Ctrl-11 translates your entire desktop.
  • I got bad results with older consoles (NES, Sega Master System, SNES, Genesis), especially games that are only hiragana and no kanji. PC Engine, Saturn, Dreamcast, Neo-Geo, Playstation, etc worked better as they have sharper fonts with full kanji usually.
  • Some game fonts work better than others
  • The config.txt has a lot of options, each one is documented inside that file
  • I’m hopeful that the OCR and translations will improve on Google’s end over time, the nice thing about this setup is the app doesn’t need to be updated to take advantage of those improvements or even additional languages that are later supported

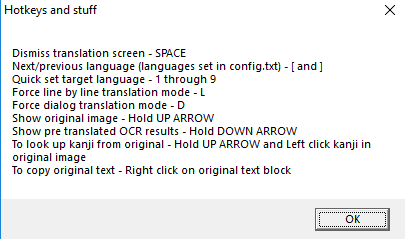
After a translation is being displayed, you can hit ? to show additional options.  Also, this is outdated, use the real app to see the latest.

Misc videos of features

Latest changes

10/31/2021 – V0.72 Beta

This release is bugfixes and new features to support using UGT in tandem with other translation software that work with clipboard data.

  • FEAT: Can now disable translations completely (useful if you only want the OCR features) – set the active language to “00”. Config text file has an example showing how to do it
  • FEAT: Added “Invisible mode (no overlay)” checkbox to the in-app options, if checked, UGT won’t actually overlay anything over the game. (it will look like it’s not doing anything, but as long as you’ve selected to put the text on the clipboard in the config.txt, this should work for people who are using another app to view the pre or post translations)
  • BUGFIX: Export to html handles line-by-line correctly
  • When copying things to clipboard, no longer includes the extra whitespace or last CR. Hm, or did we want the last CR? Oh well, let’s try this (jotumn)
  • BUGFIX: Fixed freeze/crash that happened when Google processes text as upside-down (Meerkov)
  • Added deepl_api_url config.txt setting, allows you to switch to the paid URL if needed.  Previously it just would give a wrong URL error if you used the paid version, oops. (RandomTemere)
  • Pre-translated text blocks are now colored similar to post-translated text (ie, green for dialog), was kind of confusing that they weren’t before.

11/01/2021 – V0.73 Beta

  •  BUGFIX: UGT screen shouldn’t be able to end up off the screen in an unusable position. Sometimes it takes two clicks to fix so it’s still slightly sketch though (Cloudstrifeff7)
  • Now adding spaces in “dialog” mode text at a CR even when Google thinks it’s a continuation of a word, Google seems to be wrong a lot, so hopefully this is overall better. (no change for asian languages) (Cloudstrifeff7)
  • BUGFIX: Alt-tabbing and opening UGT’s main menu no longer causes it to forget the last custom rect scan area set (Cloudstrifeff7)

11/07/2021 – V0.74 Beta

  • BUGFIX: Fixed ugly bug with the hotkey system creating non-functional duplicates, not sure if it broke anything big but it can’t be good
  • BUGFIX: Changed timing so it doesn’t sometimes cause weird laggy behavior in Windows 11, probably helps with earlier versions too
  • Now gives a nice message if a hotkey can’t be registered with instructions on why and how to fix it (Cloudstrifeff7)

(Older history moved here, was getting outrageously long)

Download

NOTE FOR UPGRADING: It’s recommended to start with the config_template.txt again, just copy over your google API key and rename it config.txt again.

Download Universal Game Translator for Windows (64-bit) (Codesigned by Robinson Technologies)

Get an error about DXINPUT_1.dll missing?  Please install The Microsoft DirectX® End-User Runtime

This is an open source project on Github

Conclusion and the future

Some possible upgrades:

  • A built in Kanji lookup also might be nice,  Jim Breen’s dictionary data could work for this.
  • My first tests used Tesseract to do the OCR locally, but without additional dataset training it appeared to not work so hot out of the box compared to results from Google’s Cloud Vision.  (They use a modified Tesseract?  Not sure)  It might be a nice option for those who want to cut down on bandwidth usage or reliance on Google.  Although the translations themselves would still be an issue…

I like the idea of old untranslated games being playable in any language, in fact, I went looking for famous non-Japanese games that have never had an English translation and really had a hard time finding any, especially on console.  If anyone knows of any I could test with, please let me know.

Also, even though my needs focus on Japanese->English, keep in mind this also works to translate English (or 36 other languages that Google supports OCR with) to over 100 target languages. 

Test showing English being translated to many other languages in an awesome game called Growtopia

Spawning annoying black holes in Fortnite to force a kid to exercise

Sure, there are ways to get exercise while gaming. Virtual reality and music games like Dance Dance Revolution come to mind.

But that’s all worthless when your kid just wants to play Fortnite.

Behold, the PlayStep!

Edit:  Also check out the PlayStep Mini, a $10 version!

This thing forces him to work up a sweat. This post details what methods I used and issues I had making it.  (Github source code for the program that runs on the Pi here for anybody who wants to make one)

Building a screen blanker connected to exercise isn’t a new idea (see the end of this post for related links I found) but my version does have some novel features:

  • Dynamically modifies the video and audio of the game’s HDMI signal to do things like partially obscure the screen in random ways
  • Uses an energy bank so you can save up game time.  This means you can madly pedal in the lobby and still sit in a chair during the critical parts of Fortnite

I first built a cheap version (~$120 in parts).  It just blanks the screen when you’re out of energy, and uses an LCD screen to show energy left.

I then did a better but more expensive way (~$700 in parts) but it’s a lot cooler.

The expensive version with HDMI in/out, the “enclosure” is a plastic basket thing from the dollar store

Things both ways have in common:

  • Use a Raspberry Pi 3B+ (a $40 computer with hardware GLES acceleration) with the Retropie distro – I start with it because its mouse/keyboard/GLES/SDL works out of the box with Proton SDK where normal Raspian requires tweaking/compiling some things
  • Use Proton SDK for for the app base (allows me to design/test on Windows, handles abstraction for many platforms so I can write once but run everywhere)
  • Use hall effect sensors to detect the pedal down position on each pedal via the Pi’s GPIO, this way a kid can’t cheat, he’s forced to move the full range of the stepper
  • The sensors are placed on a stepper exerciser.  I used a USB connector for the wiring so I could unplug/replace it later if I wanted to setup a different exercise machine, like if I ever got a stationary bike.

Yes, I’m about to duct tape an electrical taped sensor to a pencil that has been zip-tied in place. What? I never said I was pro

A note on using USB cables for wires and my idiocy

Each hall effect sensor requires three wires.  We have two sensors.  So we need to run six wires from the Pi GPIO pins?  WRONG! We only need four because the power and ground can be shared between them.

Update: This was dumb, I later just used the built in hall effect sensor these steppers already have.  You just need one, it doesn’t force the same range but it’s good enough.

So I thought hey, I’ll use USB cables and connectors laying around as they have four wires in them. (until we get to USB 3+ cables, but ignore that)

Then I thought, if I could find a simple USB Y splitter, it will be easier to share the power/ground with the two sensors . (I’m not actually using this as a USB connection, it’s just so I can use the wire and handy plugs)

Wow, I found this for cheap on Amazon:

Perfect!  A lowly USB splitter that I’m sure just has no fancy electronics hidden inside

So I partially wired it up but when testing found that the middle pins had no continuity.  Can you guess why?

WHAT THE HELL IS THIS INSIDE THE CABLE?!

It’s got a hub or something hidden in the connector.  I never plugged it into an actual PC or I might have noticed.  No wonder it didn’t work.  I removed the electronics part (it was a horror, I shouldn’t be allowed near soldering irons) and it worked as expected. Moral of the story is, I’m dumb, and don’t trust USB splitters to just split the wires.

The cheap way (just screen blanking with LCD panel)

My “cheap” way ignores rendering anything graphical (It doesn’t output any HDMI itself) and just shows a single “energy count” number on an LCD screen.  When it gets low, the game’s HDMI signal will be completely shut off until it goes positive again.  In the video above I’m using little buttons to test with instead of the stepper.

Edit: Check out this all-in-one more svelte version I did more recently

To help the user notice the screen is about to shut off it makes a beeping noise as the counter nears zero.

I suggest never testing this at an airport, can’t stress that enough really.

So how can a Raspberry Pi turn on/off the game’s HDMI signal?

A splitter with no USB power = a dead signal

This is hacky but it works – I took an old 1X2 HDMI splitter and powered it from one of the Pi’s USB ports.  (lots of electronics these days use a USB plug for power)

I only use one of the outputs on the splitter as I don’t really need any splitting done.

It’s possible to kill the power on a specific Pi USB port using a utility called uhubctrl.

So when the player is out of “energy”, I kill the USB port powering the HDMI splitter by having my C++ code run a system command of:

./uhubctl -a off -p 2

And because the HDMI splitter is now unpowered, the signal dies killing the game screen.

After turning the USB port back on (replacing “off” with “on”) it will power up and start processing the HDMI signal again.  Originally I was using the Pi to turn on/off an entire AC outlet but that seemed like overkill – I was thinking maybe turning off an entire TV or something, but meh.

So the big downsize of this method is it takes up to 5 seconds for the HDMI splitter to turn back on, and your TV to recognize the signal again.  It works but… not optimal.  Also, in my case I don’t really have a good place to put the LCD screen or speaker for the beeping. (might make more sense on a stationary bike instead of a stepper)

Alternate way to disable the HDMI signal : Instead of this no-wiring hack, maybe instead run it through an HDMI cable but put one of the pins into a relay to turn that pin on/off?  Might be the same effect but cheaper and simpler.. although, which pin?!

The expensive but better way (offers more options with images and audio)

There isn’t enough drama in simply turning the HDMI signal on/off – wouldn’t it be better if holes started spawning randomly over your actual gameplay and you had to pedal to remove them as your screen became increasingly obscured?!  There are a million options, really.

The Raspberry Pi can generate the graphics (thanks GLES) and audio but we need a way to overlay its HDMI output over the game’s HDMI signal with no noticeable latency costs at 60fp.

This is known as a chroma key effect.  (Side note: I once bought a $5,000 video mixer in the 90s so I could do live-effects like this, a WJ-MX 50.  Just saw one on ebay for $100, damn it’s big)

The V-02HD. A lot cheaper than $5,000.

The cheapest stand-alone way I found to do it these days is a Roland V-02HD video switcher. (I bought it for $664 USD from Amazon Japan)

Does anybody know a better/cheaper alternative? If I could figure out a no latency way to overlay with an alpha channel instead of just chroma that would really be ideal.

Edit: The Atem Mini HDMI Live switcher looks like it would work too, it’s a bit cheaper.

Further edit: Check out the $10 version I built, although it lacks the bells and whistles

It’s pricey, but it works perfectly.  It has the following features of interest:

  • Remembers all settings when powered on, including chroma key mode and color/sensitivity
  • Can disable auto-detection so inputs 1 and 2 are always the same even if input is turned off
  • Can disable all buttons/levers on it so accidental changes won’t happen (we don’t need them active, it’s just a black box to us)
  • It’s pretty small for a video switcher
  • Mixes audio into the HDMI signal from both inputs
  • No noticeable latency

Although I didn’t need or use it, it’s worth noting that it can show up as a USB MIDI device and be controlled via MIDI signals.  I did not need those features but that’s pretty cool, assuming the Pi could work with it, you could do transitions between inputs or enable/disable effects.

The Software

With no color keying, this is what the raw Pi video out looks like

The software to control things uses Proton SDK with its SDL2 backend and WiringPi for the GPIO to read from the sensors.  It’s modified from the RTBareBones example.

It uses a config.txt file to adjust a couple things:

max_energy|600
energy_timer|1000
energy_per_move|7

PlayStep Source code on github

Here’s some info on how to compile Proton examples.

To allow the Pi to correctly output 1080P HDMI even if the switcher hasn’t booted up yet, I edited the /boot/config.txt  and set:

hdmi_force_hotplug=1
hdmi_drive=2

To fix remove the unnecessary border I also set:

disable_overscan=1

Final thoughts

Might be fun to simply design Pi powered pedal games that use the stepper as a controller.  You could then output straight to a TV or TFT screen without worrying about the spendy chroma-keying solution.

I mean, sure, my kid would refuse to play it, but it could be a funny thing to show at a meet-up or something.

Related things to check out

  • Cycflix: Exercise Powered Entertainment – Uses a laptop to pause netflix if you don’t pedal fast enough.  He connected an arduino directly to the existing stationary bike electronics to measure pedaling, smart.
  • No TV unless you exercise! – Arduino mounted on a stationary bike cuts RCA signal via a relay if you don’t pedal enough.  Uses a black/white detector for movement rather than hall effect sensors.
  • TV Pedaler – A commercial product that blanks screen if you don’t pedal enough that is still being sold? The website and product seem really old (no HDMI support) but they accept Paypal and the creator posted here  a few years ago about his 1999 patent and warned about “copying”.  Hrmph.  His patent covers a bunch of random ideas that his machine doesn’t use at all. Patents like this are dumb, good thing it says “Application status is Expired – Fee Related” I guess.
  • The EnterTRAINER – This defunct commercial device is basically a TV remote control with a heart monitor you strap to your chest.  Controls volume and TV power if your heart rate goes too low. Its hilarious infomercial was posted in one of the reviews.
  • The 123GoTV KidExerciser – Ancient commercial product that lets you use your own bike in the house to blank the TV if not pedalled fast enough.  Company seems gone now.

Dev Diary: Fun with Arduino, Proton on the Raspberry Pi & PiTFT, GT Monitor

Is there one among us who hasn’t fantasized about inventing evil mechanical wonders?

Perhaps a synthetic life form that can navigate to the living room and shoots nerf projectiles at a surprised spouse?  Who hasn’t imagined creating an electroluminescent holiday masterpiece (like Phil Hassey did) or dreamed of becoming a kid’s hero for adding humble blinking lights to a birthday cake?

cheap_kit

So yeah, I bought a cheapo Arduino set. It was.. ok, I guess.  Some pins were bent and the .pdf I found online for it was difficult to understand.. how do I even use all this stuff? But my taste hath been whet and must be satiated so I splurged on the real Arduino starter kit ($100) which is much better for beginner fools like me.

arduino_setAn actual book!  It’s worth the extra cost. I did about half the tutorials – made lights blink, switches switch, and a piezo whine annoyingly. No way that Zoetrope was ever going to spin right, did anybody get that working?

For my first real project, I wanted to create a stand-alone monitor for Growtopia that would show me how many users are online, alert me about errors (“SERVER IS DOWN, WAKE UP FOOL!”), and display live sales data with audio.  (cha-ching, you made money!  Oh, don’t pretend you wouldn’t do (or have done) the same, it’s just for fun. Unless it’s silent, then it’s more depressing than fun really)

It had to be something I could carry to bed or a restaurant and would just work.

Doing something like that is really a challenge with an Arduino.  First, to play audio, I ordered the Arduino Wave Shield ($22) and was overly proud when my amateurish soldering actually worked. I can now play 12 bit .wav files, yay.

Have I mentioned I love Adafruit?  They don’t just sell you stuff, they also have fantastic tutorials on how to use the thing you just bought – so buy from them!

You know what? This Arduino Uno R3 is very limited. It’s ok at doing one thing – but when you start trying to stack things together you run into limitations very quick. Does the Wifi Shield even work with the Wave Shield? Would any pins be left over for lights? Would the program to do all this fit into 32k? You can forget about decoding mp3 audio unless you add hardware.

Enter the mighty Raspberry Pi

So I set that aside and got a CanaKit Raspberry Pi set ($70 as I write this).  Hey, wait a minute, it’s just a cheap, tiny computer! It’s marvelous. It can run linux, and has hardware pins to read/write to electronic things like lights and motors.  You don’t need a Wifi Shield or a silly Wave Shield because it plays audio out of the box and you can just plug a USB Wifi dongle in.

First thing I did was write a simple C++ program using gcc from the ssh command line. Next, I set things up so I could write/debug in Visual Studio on Windows, then had a .bat script running in the background to constantly rsync the entire directory to the Raspberry. You can download a neat package of linux-like tools that work with ssh and run on windows here.  You’ll probably want to setup SSH keys so you don’t need a password.

SET PATH=%PATH%;C:\tools\Grsync\bin
 :start
 rsync -avz linux/ root@192.168.1.46:/root/seth
 :pause
 #timeout /t 10
 goto start

On the Raspberry Pi linux side, I setup a .sh file to run cmake and make in a loop for a continuous compile. I feel mean making it work so hard, but whatever.

After compiling and running it in Windows, I just had to glance over at the ssh window to verify it worked under linux as well, or what the compile error was if not.

Don’t underestimate the value of setting up scripts that allow you to be lazy like this. Workflow is everything!

To get GPIO access (read/write the pins to control lights and motors) I used a C++ library I found called Wiring PI.  Naturally that part doesn’t work in Windows (could write a fake interface that mimicked it and.. nah), so I #ifdef’ed that part out for Visual Studio.

To play audio I cheated a bit and just ran a system program (called “aplay”) to play .wavs:

void PlaySound(string file)
{
     system( (string("aplay ")+file+" --quiet").c_str());
}

Real hard, right?

But if you want to run a system command and be able to also read the results it gives, you need something more like this:

//a bunch of linux headers you probably need for this, the above function, and more
#include <syslog.h>
#include <unistd.h>
#include <sys/socket.h>
#include <fcntl.h>
#include <sys/ioctl.h>
#include <linux/types.h>

string RunShell(string text)
{
string temp;
#ifndef WINAPI
//printf("running: %s\n",text.c_str());
 FILE *fpipe;
 char line[256];
if ( !(fpipe = (FILE*)popen(text.c_str(),"r")) )
 { // If fpipe is NULL
 return ("Problems with pipe, can't run shell");
 }
while ( fgets( line, sizeof(line), fpipe))
 {
 temp += string(line)+"\r";
 }
 pclose(fpipe);
#else
//well, on window let's pretend it worked as I don't have curl/etc setup here on windows
 temp = "(running "+text+")";
#endif
 return temp;
}

So how can I get data from the server?  Well, it’s linux, so I cheated and just have the C++ call the utility curl and grab what it returns:

string returnInfo = RunShell("curl -s http://somewebsite.com/myspecialstuff.php?start="+toString(g_lastOrderIDSeen)+"&max="+toString(max)+"");  //or whatever you want to send

Parse what it gives back, and there you go.

raspberrypi

In the above pic, it’s working.  The red light goes on for a normal Growtopia purchase (Gem’s Bag, etc), the green light flashes for a Tapjoy event. I have a little battery powered speaker connected to the Pi’s headphone jack to play audio for each event as well.  The button on the breadboard toggles audio for Tapjoy.

What about portable video?

Audio and blinking lights will only get you so far, this isn’t 1950s scifi. To show the active user count of the game I need a portable screen. The easiest would be a tiny monitor with an HDMI plug (raspberry has that built in), but I didn’t really see anything for sale that was cheap, tiny, and had low battery requirements.

On the other end of the spectrum, there is a tiny two line LCD like this. Nah.. oh hey, the Adafruit PiTFT, a 320X240 screen with touch controls for $35!  Perfect.

proton_pi

To get it going I had to install their special linux distribution for it. (they have a whole tutorial thing, it’s not hard)

Unfortunately we have no GLES acceleration.  So how do we do C++ graphics without GL? I considered trying to use something like Mesa (I use that on the Growtopia servers to render images, it’s a software GL solution) but.. meh, let’s be old school here.

You just draw bytes directly to the frame buffer, like your grandparents did! I found some great info on framebuffer access and handling touch events on ozzmaker.com.

Actually I guess there might be a version of SDL that will work with this screen (?), but I’d prefer to use my own stuff anyway so I created a “Proton-Pi” lite version of Proton SDK that is modified to work with only SoftSurface instead of Surface (which is GL/GLES only) and only includes a subset of features. I could maybe make a demo app and zip it up if anybody wants it.

It has no audio or Entity stuff. RTFont can now render directly to a 32 bit SoftSurface and then to update the screen you blit to the framebuffer. I think it gets like 15 fps.  Would be faster without the slow 32 bit to 16 bit conversion on the final blit… but meh, who cares for this.

server_monitor

So here is the final result.  Thanks for the 2.2 cents, kanyakk! You just plug it in to power (I’m using a $20 7800 mAh phone charger pack) and it will run quite a while. (I left it on overnight and the battery reported half charge)

The Linux stuff has been setup with the logon info of my home wifi as well as my iPhone’s hotspot wifi, this way it can be used anywhere, as long as I remember to turn on the hotspot sharing. After boot it automatically starts running the GT monitor program.

I took it to a restaurant, it worked! But I ended up hiding it because when people logged off and the numbers ticked down the whole thing sort of looked like a homemade bomb or something and I didn’t want to creep everyone out more than usual.

Final thoughts

Well, it was fun but .. but alas, the cold hard reality hit me; I could have just written an iPhone app to do the same thing. (or as Phil pointed out, a web page, which would be the ultimate in portability)  My end result has no cool physical buttons, servos, or even blinking lights.

I just fell right into the old comfortable “programmers groove” of doing it all through software.

Tips (?):

  • Copying a 16 GB (mostly empty) sdcard to a 8 GB for say, a second unit, is a big hassle due to linux card sizing/partition issues, so you might want to start with 8 GB microSD cards from the beginning unless you really need the space.  (They are only $5 a pop)
  • Raspberry Pi is cheap and amazing! Most useful if you are ok with linuxy stuff.. or at least willing to learn
  • Tried a BeagleBone too, it’s like a Raspberry Pi, but less popular so lacking hardware add-ons/tutorials for now
  • Even though it sounded like I’m bagging on the Arduino in this post it’s still the perfect thing to use if you need to control something simplish with no boot times and low battery usage.

But I’ve got a pretty cool idea for the next project…

Socket City – a little free web game I made over the weekend with Proton for Ludumdare

Click here to play the web version now.  (updated to work on touch mobile like iOS browsers as well)

Socket City – a game I made last weekend

So Ludum Dare 24 has come to a close, it looks like 1405 games were made over the weekend, a new record. (Barely!)

In LD23 (the one before this one), I  had used Flash+Flashpunk to create a little platformer.  I never really felt comfortable, and as a result did not dig deep into the real “programmy” end of it, so instead focused on creating the most creepy boss in the history of games.

But this LD the flash target of Proton is now functional (that’s the true reason I did flash last time, to learn enough to write the Flash target!) so I got to use good ol’ C++ and still have a web-playable version.  So less creepy, more game design.

The theme was “evolution”.  My idea was what if you were presented with three alternate versions of a space town each day, and had to choose which one to use, essentially “evolving it” by choices rather than getting to build it.  Each town piece has little “sockets”, new town pieces can only “grow” off of those.

To turn it into a real  game, I added asteroid attacks between rounds, the concept of resources, life, and turret gun pieces that add an action element.

After I built it along far enough play, I discovered…

It’s too damn random

Only getting to choose between three plans was too limiting.  To combat this, I allowed the player to “rotate” new pieces at will, so he could at least point guns the way he wants, and point sockets at the places he’d like to grow.  Other ideas might have been having more plans to work with, or generating 3 new plans at some cost (1 resource?) and such.

Originally I was only going to grow the base on  the bottom of the screen and have all rocks falling down, but later decided to put it in the center of the screen and grow  “in all directions”.   Not sure if that was the right choice or not.

What went right

  • Scope and difficulty of this project was about perfect for me, not too hard, not too easy
  • Proton and its flash target worked out of the box, no time wasted on fooling with it, and being able to test/debug in MSVC++ was very comfortable for me as compared to last LD with FlashDevelop and AS3.  Also nice knowing I can pop it on iOS/droid easy enough.
  • Decent audio – used Garageband iOS on the iPad with a cheapo midi keyboard, and sfxr
  • Went with simple, abstract graphics.  Was tempting to try to do something fancier but.. you know it would have turned out pretty horrible.
  • Added a nice goal condition of getting special win song and poem if you pass level 10.  I think that’s important to give the player something to shoot for, instead of just dragging on forever
  • Successfully designed the interface for both mouse and touch, no keys are used
  • I like how I handled life/game over – little hearts represent “life support units” and if they are all destroyed, you die.  Adds an extra element of needing to protect them.
  • Happy with the final game, it’s fairly polished for a 48 hour.  My son won it and proclaimed it “great”.  What more can I ask for?

What went wrong

  • Game difficulty is still uneven and too random, especially in the beginning
  • The graphics lack clarity and style, they definitely bring down the whole feel of quality of the game.  I’m not sure how to deal with that…
  • The “sockets” are especially not clear graphically, and look almost identical to the gun barrels.
  • Has various issues like the asteroids spawning too close to your city, the upgrade menu covering part of your city, stuff like that.  Just wasn’t really time to fix the “little stuff”.
  • Knowing the Flash target was 640X480 and possibly slow, I sort of designed for that.  If I hadn’t, I probably would have done high rez and much larger/complex cities, really pushed everything up a notch…

Conclusion

Good experiment.  If I wanted to fix this up and take it to the next level, this is probably what I’d do:

  • Remove the plan/growth stuff completely and just let the player buy pieces, pieces with more sockets cost more
  • Make turrets automatically fire, turn it more into a tower defense game
  • Change everything to be real-time, should be able to add additions at anytime, even during attacks.  Especially during attacks.
  • Add a sim city element, build see tiny cars moving around, hear tiny people screaming when asteroids or aliens attack.  Build entertainment buildings to keep population happy, get more resources, speed up repairs, etc.
  • Replace art with high tech 3d renderings of the tile pieces
  • Huge overall to the camera/zoom system.  Should be able to pinch and move around at will on a touch device

Anyway, as always, LD was a good experience.  Special thanks to Akiko for watching the kids all weekend and making this possible! Oh, and for making this:

Proton SDK update – Flash, iCade, Chartboost, Flurry and an Assembly talk

My free, open source, cross-platform app framework, Proton SDK has been steadily getting updates and fixes.

What’s new?  Check this stuff out:

  • Flash support announced!  Still in beta, but it works.  Examples run at full speed with zero extra changes thanks Alchemy 2 and a GL ES to Stage3D adaptor I’ve written
  • iCade controller support via GamepadManager plugin (works on both iOS and Android!)
  • Chartboost support via AdManager plugin
  • Flurry support via AdManager plugin
  • 60beat GamePad support via GamepadManager plugin (iOS)
  • DInput support for controllers via GamepadManager plugin (Windows)
  • Tons of bugfixes, tweaks,  and improvements

Documentation is still, how shall we say, .. somewhat lacking, but some progress has been made and there is a working example application for everything.

Assembly Summer 2012 Proton Talk

Proton Pro and contributor Aki Koskinen will be giving a talk about Proton SDK August 2nd at 21:00 at Assembly, so check it out if you’d like the low down on what differentiates it from the millions of other frameworks out there and if it would be a good fit your project.