
What is it about the Atari 2600?
It was the summer of 1983 at Jeff Mccall’s slumber party when I saw my first game console.
Crowded around the small TV we gawked at the thing – an Atari VCS.
The seven of us took turns. Passing the joystick around like a sacred relic we navigated Pitfall Harry over hazardous lakes, crocodiles and scorpions.
One by one the other kids fell asleep. Having no need of such mortal frivolity, I played Pitfall all night!
I fainted in the street the next day due to sleep deprivation. Worth it.
The challenge
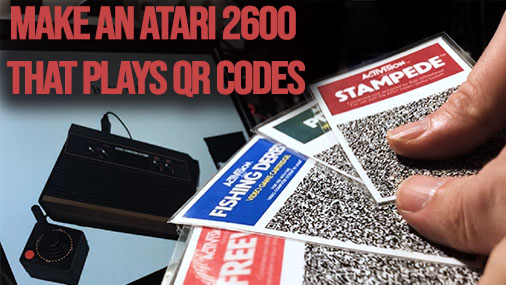
It’s kind of mind-blowing that games that originally sold for over $30 ($70+ in 2018 money) can now be completely stored in a QR code on a small piece of paper.
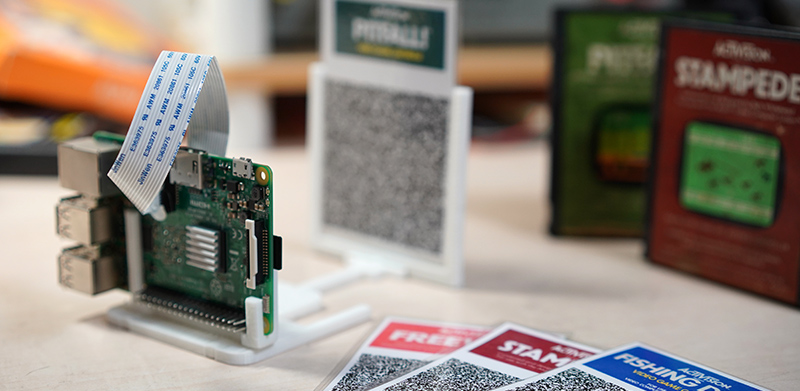
As a poignant visual metaphor for showing my kids how much technology has changed, I decided to create a Raspberry Pi based Atari that accepts “paper carts” of actual Atari 2600 games.
The requirements for my “PaperCart” Atari VCS:
- Must use the real QR code format, no cheating by tweaking the format into something a standard QR reader couldn’t read
- 100% of the game data must actually be read from the QR code, no game roms can be stored in the console, no cheating by just doing a look-up or something
- Runs on a Raspberry Pi + Picamera with all open source software (well, except the game roms…)
- Can convert rom files to .html QR codes on the command line, sort if need this or we’ll have nothing to print and read later
- Easy enough to use that a kid can insert and remove the “paper carts” and the games will start and stop like you would expect a console to do
- Standard HDMI out for the video and audio, USB controller to play
All about QR codes
The QR in QR Code stands for Quick Response. It’s a kind of 2d barcode that was invented by a Japanese company named Denso Wave in 1994. They put it into the public domain right from the get go, so it’s used a lot of places in a lot of ways.
QR codes have a secret power – they use something called Reed-Solomon error correction. It has the amazing ability to fill in missing parts using extra parity data. More parity data, more missing data can be reconstructed. Not certain parts, ANY OF THE PARTS. I know, right?
Reed-Solomon is also used in CDs, DVDS and Blu-ray, that’s why a scratched disc can still work.
Remember those .par files on Usenet you’d use when you were downloading a bunch of stuff in chunks? Yep, parchives were based on Reed Solomon.
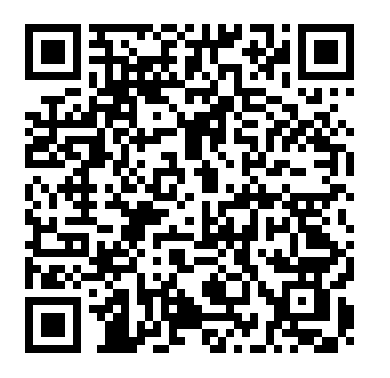
I hid a fun Atari fact in this code.
I’ve encoded some text in the above QR code with error correction set to Level H (High), which means up to 30% can be missing and you can STILL read it!
Go ahead, block some of it with your fingers, put your phone in camera mode and point it at the QR code above. Does it work? That’s the Reed-Solomon stuff kicking in.
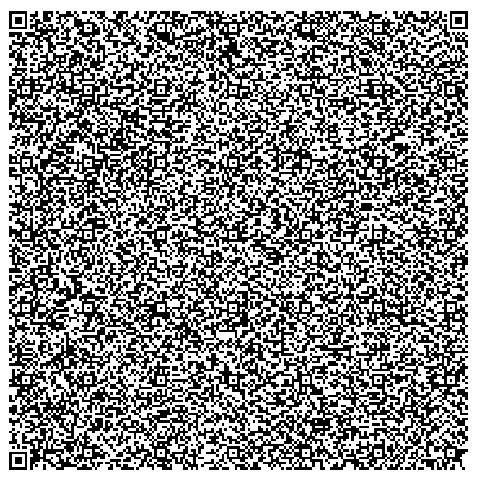
QR codes automatically jump to larger sizes to encode more data – from version 1 to version 40.
Can you find your way out of this maze? Does your brain hurt yet? Hope no one took that seriously and actually tried.
Above is a version 40, the most dense version. My iPhone is able to read this one right off the screen too. If you have problems, you can try zooming into the page a bit maybe.
This is the first 2900 characters of Alice In Wonderland. We can store a max of 2,953 full bytes. A byte is 8 “yes or no” bits. With that, you can store a number between 0 and 255.
Because text doesn’t need a whole byte, there are smarter ways to store it which would allow us to pack in much more than we did here – but let’s ignore that as we’re only interested in binary data.
If I show the QR code too clearly, I might be enabling rom piracy and get in trouble. Weird, right?
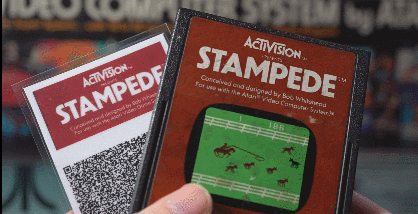
This game (Stampede) has 2,048 bytes (2K) of rom data so it easily fits inside a single QR code.
Other Activision classics like Fishing Derby and Freeway are also 2K games but Pitfall! is 4K game. Using gzip compression saves us nearly 20% but it’s still a bit too big to fit in a single QR code. To work around this I’ve added a “Side B” to the other side of the Pitfall! card. Cart. Whatever it is.
My paper cart format stores some metadata so the reader can know how many QR codes are needed for the complete game, as well as if the data is for the same game or not by storing a rom hash in each piece.
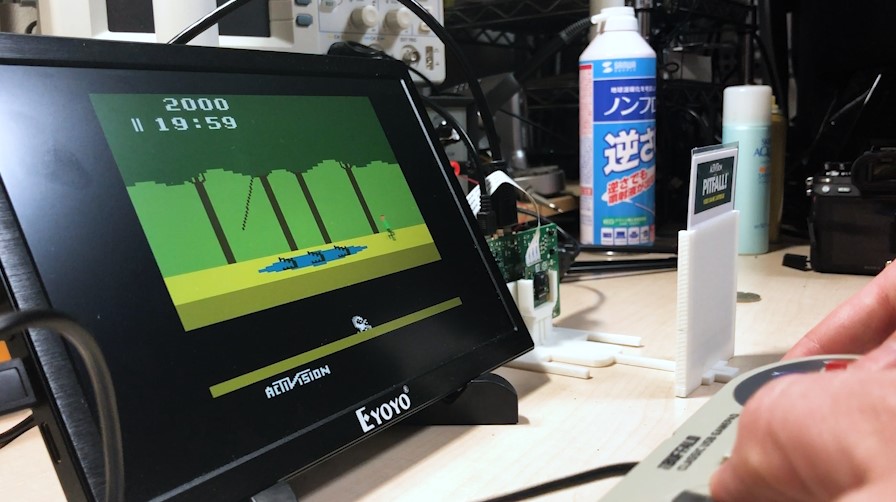
Emulating a 2600 on a Raspberry Pi 3
I started with latest Retro Pi image and put that on a micro SD card. RetroPi has an Atari 2600 emulator out of the box that can be directly run from the command line like this:
/opt/retropie/supplementary/runcommand/runcommand.sh 0 _SYS_ atari2600 <rom file data>
So now I just needed to write some software that will monitor what the Pi camera sees, read QR codes, notice when no QR code is present or it has changed and start/stop the emulator as appropriate.
Writing the software – PaperCart
Naturally I chose Proton SDK as the base as it handles most of what I need already. For the QR reading, I use zbar, and for the webcam reading I use OpenCV and optionally raspicam instead. (no need for OpenCV on the Raspberry Pi linux build) I put it on github here.
The PaperCart binary can also be used from the command line to create QR codes from rom files. (It uses QR-Code-generator)
RTPaperCart.exe -convert myrom.a26

or on the raspberry:

RTPaperCart -convert myrom.a26
It will generate myrom_1_of_1.html or if multiple QR codes are needed, a myrom_1_of_2.html and myrom_2_of_2.html and so on. I opened in the web browser, cut and pasted them into photoshop, scaled them down (disable antialiasing!) to the correct size and printed them.
A quick note about zbar and decoding binary data in a QR code
If you want binary data to look exactly as it went in (and who wouldn’t?!), you need to do a little processing on it after zbar returns it with iconv. Here is that magical function for any future googlers:
string FixQRBinaryDataEncoding(string input)
{
	iconv_t cd = iconv_open("ISO-8859-1", "UTF-8");
	if (cd == (iconv_t)-1)
	{
		LogMsg("iconv_open failed!");
		return "";
	}
	int buffSize = (int)input.length() * 2;

	string output;
	char *pOutputBuf = new char[buffSize]; //plenty of space
	size_t outbytes = buffSize;
	size_t inbytes = input.length();

	char *pOutPtr = pOutputBuf;
	char *pSrcPtr = &input.at(0);

	do {
		if (iconv(cd, RT_ICONV_CAST &pSrcPtr, &inbytes, &pOutPtr, &outbytes) == (size_t)-1)
		{
			LogMsg("iconv failed!");
			SAFE_DELETE_ARRAY(pOutputBuf);
			return "";
		}
	} while (inbytes > 0 && outbytes > 0);

	iconv_close(cd);
	int finalOutputByteSize = (int)buffSize-(int)outbytes;
	string temp;
	temp.resize(finalOutputByteSize);
	memcpy((void*)temp.c_str(), pOutputBuf, finalOutputByteSize);
	SAFE_DELETE_ARRAY(pOutputBuf);

	return temp;
}
Want to make your own?
It’s pretty straight forward if you’re comfortable with linux and Raspberry Pi stuff. Here are instructions to set it up and download/compile the necessary software.
(If you really wanted, it’s also possible to do this on Windows, more help on setting up Proton on Windows here, you’d also need to OpenCV libs and Visual Studio in that case)
- Write Retropie image to a microSD card, put it in your pi
- Make sure the Atari 2600 emulator works in Retropie, setup a gamepad or something
- Enable SSH logins so you can ssh in, I guess you don’t have to, but it makes cutting and pasting instructions below a lot easier
Open a shell to the Raspberry Pi (as user “pi” probably) and install RTPaperCart and the stuff it needs starting with:
sudo apt-get install libiconv-hook-dev libzbar-dev
Now we’ll install and compile raspicam, a lib to control the camera with.
Note: It acts a little weird, possibly because it’s using outdated MMAL stuff? In any case, it works “enough” but some fancier modes like binning didn’t seem to do anything.
cd ~
git clone https://github.com/cedricve/raspicam
cd raspicam;mkdir build;cd build
cmake ..
sudo make install
sudo ldconfig
Before we can build RTPaperCart, we’ll need Proton SDK:
cd ~
git clone https://github.com/SethRobinson/proton.git
Build Proton’s RTPack tool:
cd ~/proton/RTPack/linux
sh linux_compile.sh
Download and build RTPaperCart:
cd ~/proton
git clone https://github.com/SethRobinson/RTPaperCart.git
cd ~/proton/RTPaperCart/linux
sh linux_compile.sh
Build the media for it. It converts the images to .rttex format.
.rttex is a Proton wrapper for many kinds of images.
cd ~/proton/RTPaperCart/media
sh update_media.sh
Now you’re ready to run the software (note: pkill Emulation Station first if that’s running):
cd ~/proton/RTPaperCart/bin
sh ./run_app.sh
You might see errors if your camera isn’t available. To enable your camera, plug in a USB one or install a Picamera and use “sudo raspi-config” to enable it under “Interfacing options“. (don’t forget to reboot)
If things work, you’ll see what your camera is seeing on your screen and if a QR code is read, the screen should go blank as it shells to run the atari emulator.
You can point your camera at a QR code on the screen and it will probably work, or go the extra mile and print paper versions because they are fun. You don’t have to laminate them like I did, but that does help them feel more sturdy.
You might need to twist your camera lens to adjust the focus.
I setup mine to automatically run when the Pi boots (and not Emulation Station) so it works very much like a console. (To do that, edit /etc/profile.d/10-retropie.sh)
Running RTPaperCart /? will give a list of optional command line options like this:
-w <capture width>
-h <capture height>
-fps <capture fps>
-backgroundfps <background capture fps
-convert <filename to be converted to a QR code. rtpack and html will be created>
3D Printing the stand
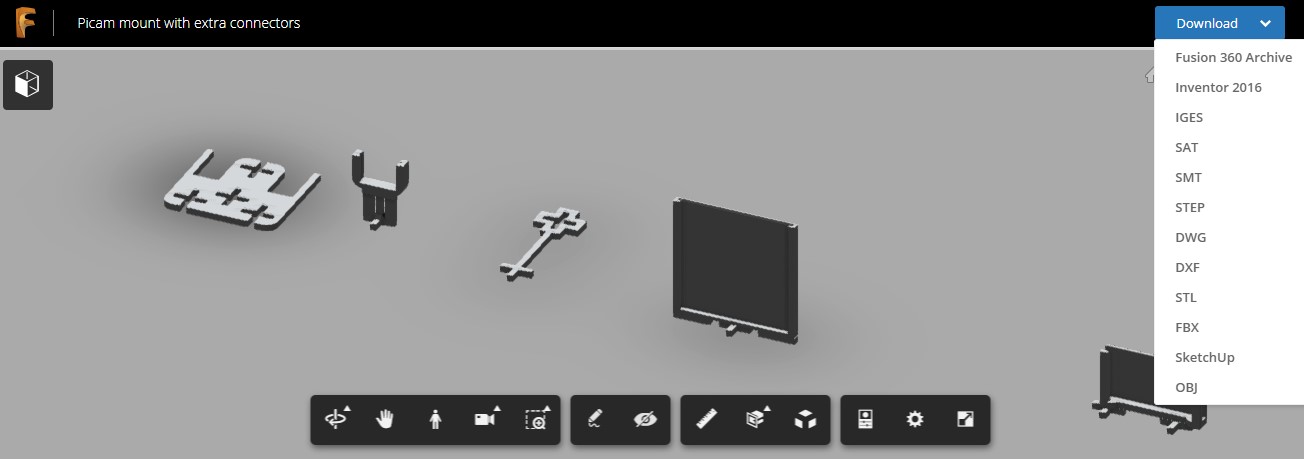
I sort of imagined designing a stylish 2600 themed case with a slot for the paper cart and fully enclosing the Pi, but that would take skill and also require some kind of light inside so the QR could be read.
So instead I did the minimum – a thing to hold the PI, camera, and easel where you insert the QR code paper.
I used Fusion 360 and designed the stand parametrically so you can fiddle with values to change sizes pretty easily. The modules are designed to snap together, no screws needed.
You can download the Fusion 360 project here, the download button allows you to choose additional formats too.
You need to kind of use common sense and print with supports where it looks like you need them.
Conclusion
So that’s great, but you’d like to store Grand Theft Auto 5 as QR codes because they are so convenient?
Let’s see, 70 gigabytes. No problem. To convert that you’ll just need about 25 million QR codes. You might want to order some extra ink now.
At one code per paper, the stack would reach a mile and a half into the sky.
If you got this far, you must also be a connoisseur of gaming history and old hardware. Check these out too then:
They Create Worlds (Podcast on gaming history, no fluff)
Matt Chat (Interviews and info about old games in visual form)
The Retro Hour (Podcast with retro gaming interviews and news)
Atari 5200 Multi-ROM Cartridge Using Raspberry Pi (Cool, something like this might make it possible to mod a real 2600 to read “paper cartridges”. Small world, Dr. Scott M Baker wrote BBS stuff too, including Land Of Devastation as well as Door Driver, a utility that allowed a dumb kid like me to write BBS games)