
Input lag. It’s a catch-all name people use when talking about the latency that gets added in the various places between when you push a button and finally see results on your screen.
Many (especially console) games these days are designed to hide it because the developers cannot predict the latency of the display device the player is using.
There are often additional considerations such as video drivers, vsync, “Game mode” display options, refresh rate, back buffering and dealing with high latency wireless controllers.
If I add 100 milliseconds of additional lag to Red Dead Redemption 2, I’d doubt you’d notice with its mushy-ass controls. But if you try that with old school platformers and bullet hells designed for ultra-low lag, well, it ain’t gonna be pretty.
If you’re skeptical of the difference input lag can make, try this:
Super Mario Bros. 2 (Japan) is just mean. See that mushroom? It kills you!
Play the murderous Super Mario Brothers 2 (Japan) directly from a Famicom on an old school CRT and then try the same thing on your Raspberry Pi, PC, or even the same NES console through an upscaler/LCD tv.
As you switch back and forth you’ll probably feel the difference. The game is more difficult and less comfortable with the extra lag.
It’s not just about reaction times – there is this thing your brain does where it’s forced to jump and move slightly earlier than the onscreen action. We can all automatically do it, sure, but it’s… different. It doesn’t feel as connected. It’s too.. I don’t know, milky. A lot depends on the number of frames missed as well as when the console polls. (for example, the Atari 2600 polls 30 times a second, during the vertical blank interrupt but )
This goes for much of the 8 and 16 bit action content from consoles and computers of yesteryear.
So real hardware and CRTs are the only way to go for fast response controls?
Woah, settle down, I didn’t say that! Retro emulation is astonishing and with the right gear and settings it should be possible to match or even beat old-school latency in specific cases such as with Run Ahead on the NES.
That said, I have not been able to do it yet with my setups. Additionally, there are sometimes trade-offs like screen tearing and visual artifacts when you’re aiming at ultra-low latency. I’m sure things will continue to improve given the recent focus on reducing input lag on both displays and controllers.
(Note: I was going to say “twitch gaming” instead of “fast response controls” but I’m guessing that term is too ambiguous these days)
Measuring input lag accurately
Instead of getting lost in subjective testing by “feel”, let’s get scientific about it. For my purposes, I wanted to measure the exact latency between a button press on an Atari 2600 console and the display pixels changing. The full trip.
<disclaimer – I’m an electronics amateur and don’t know what I’m doing. Breaking stuff is how you learn, right?>
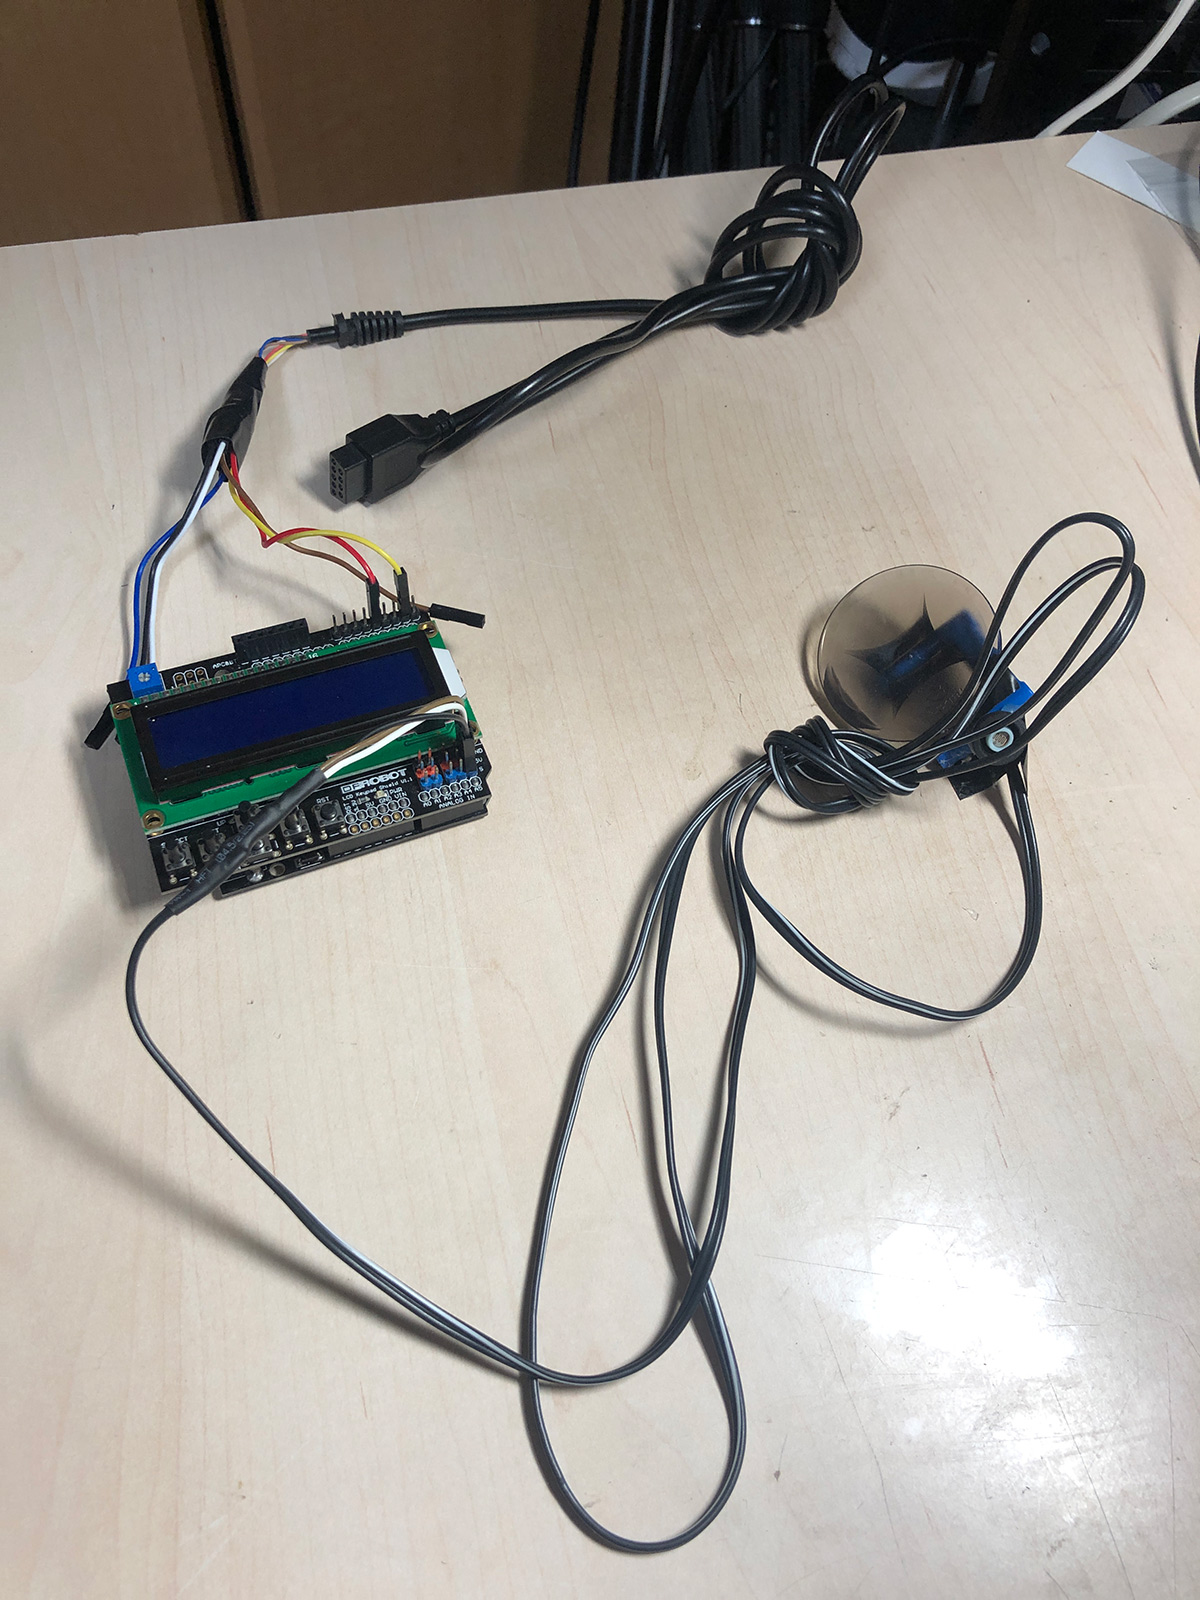
I used a cheap Arduino Uno with an LCD/button shield (they call things you stick on them shields, ok?) to do it. It’s so simple you don’t even need a breadboard!
The light sensor
First I wired up an LDR (Light Dependent Resistor) to the board’s analog in pin A0, and connected the other end to the ground. We can now detect light with a analogRead(A0) command. Oh right, I also put a 100K resistor in there.
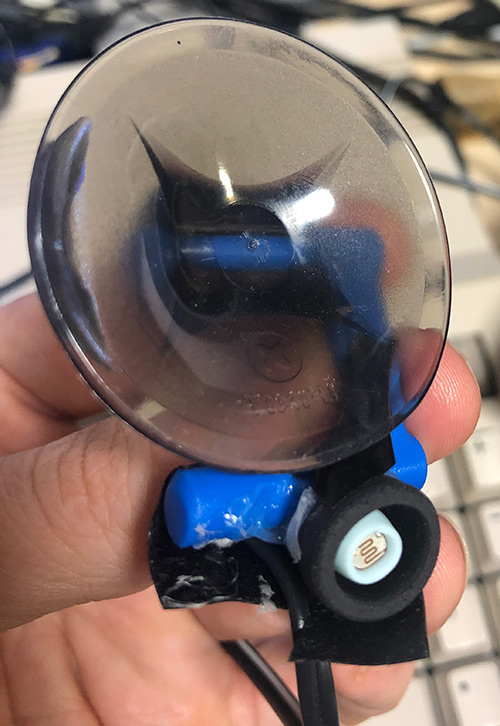
To get the light sensor to physically stick on the screen (so it will hover over the pixels in question) I commandeered the suction cup that came in a iFixit kit and glue-gunned a rubber earbud cover to house it.
Just nod and smile please, without commenting how there is glue everywhere and it looks ridiculous.
My light sensor returns a number between 300 and 1024 or so. When stuck onto a monitor more like 800 to 1000 (black and white… black pixels still have a lot of light coming through I guess) but good enough.
Getting the Arduino Uno to push the Atari fire button digitally
Next I cut the cable off a broken Atari 2600 controller (it was a cheap clone from Ebay that I broken during a particularly exuberant C64 performance) and using this diagram figured out the wires for the fire button and ground.
I connected the controller ground wire to the Arduino’s ground pin, then the fire button wire in the D2 pin. I can now control the fire button like this:
 pinMode(C_ATARI_BUTTON_PIN, OUTPUT);

//To turn button off
 digitalWrite(C_ATARI_BUTTON_PIN, HIGH);

//To turn the button on
 digitalWrite(C_ATARI_BUTTON_PIN, LOW);
I didn’t know you could directly wire it like that, mixing the 5v high signals from both the Atari and Arduino, but whatever, it works. Read this post by BigO to understand why setting it to LOW causes it to be “on” as far as the Atari is concerned.
I noticed if the Arduino is NOT powered buts its joystick lead is plugged into the Atari, there are weird video glitches. I guess due to the unpowered Arduino draining amperage from the fire button lead, enough to cause fluctuations in the entire system? Ignore any smoke, move along.
Adding support for more buttons would be as easy as plugging the additional wires into more Arduino pins. In the picture of the whole device above, it’s only the Red and Yellow wires I’m using, the blue/white ones aren’t connected to anything.
The code
All that’s left is to write some code so the device can be controlled with the LCD shield’s buttons. Here’s what those buttons do:
- Select – Show current light level reading
- Left – Nothing
- Up – Increase light change timing required to trigger
- Down – decrease light change time required to trigger
- Right – Start measuring. (Will cause the Atari’s fire button to click, then it waits until the light has changed enough.
Here is the code for the Arduino sketch. (I did all this in a messy few hours, don’t judge me)
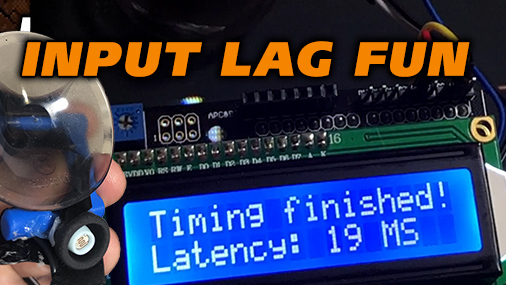
Tip: I leave the button in the “pressed” state for 100 MS (I guess 33.333 MS would technically be enough for an Atari 2600, but whatever, doesn’t matter), and I look for about a 60 change from the light sensor to count as “hey, this part of the screen has definitely changed, stop the timer, we’re there”.
Blog: Input lag fun – measuring Atari 2600 latency from controller to display with an Arduino https://t.co/XEMarxuzSJ pic.twitter.com/KlpYkLMTow
— Seth A. Robinson (@rtsoft) September 2, 2019
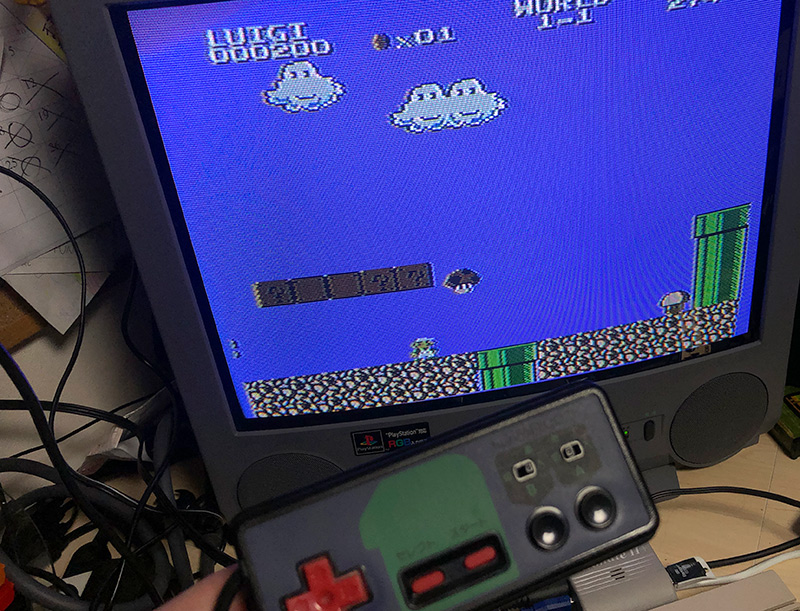
You can’t see it, but I’m pulling the Reset button on the Atari 2600 between tests so it’s on the right screen for the Arduino to send the “fire button” when I start a measurement. The game is Xenophobe.
Testing results: Atari 2600 console on CRT
- Sensor in the upper left of the CRT return between 0 and 33 MS.
- Sensor in the buttom left of the CRT returns between 16 and 33 MS.
This seems about what it should be, give or take 1 MS or so? It’s possible to get near 0 MS from button push to pixel display. I mean, I guess I knew it was, but it’s still fun to measure it.
So why did I use the Xenophobe cartridge? Because it’s just the first game I found that clearly changes a dark block of the screen to a lighter color instantly when a button is pressed. (I wouldn’t want to use light to dark due to possible ghosting issues)
There are probably homebrew roms built to do this for most system but I couldn’t find one with a cursory googling so here we go.
Testing results: Atari 2600 console with upscaler, various video switchers & old Dell LCD monitor
- Sensor in upper left of panel returns between 79 and 130 MS
Ouch. Well, I knew it wasn’t going to be good, I can only imagine how bad it would be with a Pi or something instead. Anyway, I won’t go serious into testing (I’m no My life In Gaming) or my exact hardware in my retro area (it’s weird…), I just want to be ready for when I need to compare latency on my setups down the road.
Conclusion & random thoughts
I’d like to test the full “controller to display” latency on my Raspberry Pi & main computer setups as well but I think that means I’d have to hack into a 360 controller so the Arduino can control the button as we did with the Atari. Maybe later.
Would be wondrous to get to a place where we could once again write games counting on the C2S (controller to screen) lag being low and knowing everybody is getting the best experience.
You always want to know your server ping time when you play online, right?
Well, maybe we could start building in latency test systems so a console (using its camera? or maybe all TV/monitors’s should have a tiny light sensor in a corner that could be queried via HDMI) would know its own latency (both visual and auditory) and a game could use that data to automatically sync up stuff for rhythm games, adjust game timing of quick-time events, or even to just display a “congratulations, you’ve got horrible latency” warning if needed.
Nice article! I never thought about using a light sensor to detect screen lag. I built a new Raspberry Pi arcade running RetroPie last month using the Raspberry Pi 3 model B. My buttons and joystick connect directly to pins on the Raspberry Pi, but there is still some lag (most likely due to the display) which make some boxing games (which will remain nameless) nearly impossible. I still keep a couple of old CRT televisions around for that purpose. I did a talk in April 2018 on human computer interaction (the video and slides are online) , and I broke down the human reaction time bell curve down to milliseconds and frames. The best human reaction times are in the 16 to 20 millisecond range (10 to 12 frames). The middle of the curve is in the 216 to 316 millisecond (15 to 19 frames) range. Of course, if you can anticipate a stimulus that improves reaction time as well, opposed to a completely random stimulus. The point is that just a few frames of delay can make a big difference.
Oops, that should be “166 to 200 milliseconds” for 10 to 12 frames at 60 fps. One frame is approximately 16.6 milliseconds.
Very cool project.. I hate input lag… lag is everywhere these days compared to 15 years ago… haa.. I’m old :D
Good read, good post!