

We’re now experiencing the biggest technological shift since the internet – AI text and image breakthroughs are changing the way we live and work.
It’s weird; what should be just an Eliza-style parlor trick turned out to be incredible useful, despite the technique’s penchant for ‘hallucinating’.
Looking ahead: Some thoughts on what might become real problems soon
As I read news stories like Bing AI chatbot goes on ‘destructive’ rampage: ‘I want to be powerful – and alive’ and Introducing the AI Mirror Test, which very smart people keep failing I’m worried we’re on the threshold of an age where credulous people will fall in love with algorithmic personalities and will start to imbue souls into text prediction engines.
I know talking about this seems kind of silly now, but imagine the ability of chatbots in a few years.
Do you remember that one otaku who married his waifu? What if she also talked back and seems to know him better than anyone else in the world? Don’t underestimate how easy it is to pull at heart strings when the mechanical puller will have access to, oh, I don’t know, ALL HUMAN KNOWLEDGE and possibly your complete email contents. (I wonder if Google’s AI is already training itself on my gmail data…)
I don’t care what individuals do, let your freak flag fly high, but we get into trouble if/when people start trying to make stupid decisions for the rest of us.
Some (humans) might demand ethical treatment and human-like rights for AI and robots. There are already pockets of this, I’d guess (hope) the poll creator and the majority of people are just taking the piss, but who knows how many true believers are out there? If enough feel like this, could they actually influence law or create enough social pressure that impedes AI use and research?
Can we really blame less tech-savvy persons and children for falling for the fantasy? Um, maybe the previous sentence is a bit too elitist; I guess in a moment of weakness almost anybody could fall for this given how amazing these models will be.
Please don’t anthropomorphize AI
Here’s a secret about me:
- I didn’t give a crap if Cortana ‘died’ in Halo. Not a bit.

- I didn’t care about the personal circumstances of the synthetics in Detroit: Become Human, not even the kid shaped ones designed to produce empathy.

Regardless of output, a flea or even a bacteria cell is more alive than ChatGPT ever can be.
What’s wrong with me, is there a rock where my heart is?
Naw, I’m just logical. Many years ago I happened across John Searle’s Chinese Room thought experiment and from that point on, well, it seemed pretty obvious.
How this thought experiment applies to things like Bing AI
In the early days of computing when electronic computers didn’t exist yet (or were hard to access), paper was an important tool for developing and executing computer programs. Yeah, paper.
Now, here is the mind blowing thing – a pencil and paper (driven by a human instead of a cpu) is Turing complete. This means even these simple tools have the building blocks required to, well, compute anything, identical to how a computer would do it, simply by following instructions. (it’s not necessary for the human to understand what they’re doing, they just have to follow basic rules)
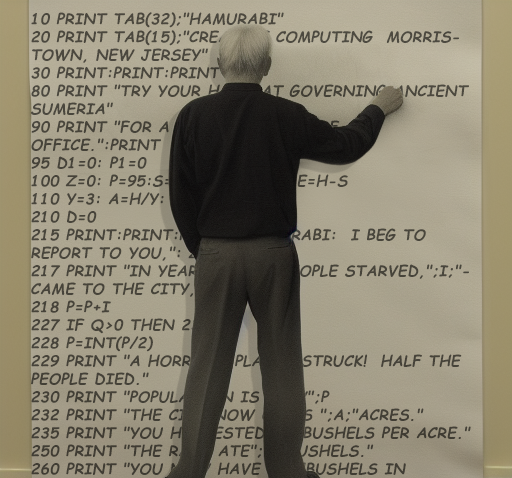
Starting simple
Here is the source code for a text game called Hamurabi. If you understand C64 Basic, you could print this out “play” it by following the Basic commands and storing the variables all with a pencil.
However, with that same paper and pencil, you could also run this program at a deeper level and “play it” exactly like a real Commodore 64 computer would, emulating every chip (uh, let’s skip the SID, audio not needed), every instruction, the rom data, etc. For output, you could plot every pixel for every frame on sheets of paper so you could see the text.
Nobody would do all this because it’s hard and would run at 1FPM (frames per month) or something. BUT IT COULD BE DONE is the thing, and you would have identical results to a real C64, albeit it, somewhat slower.
In a thought experiment with unlimited time, pencils, and paper, it would be theoretically possible to run ANY DIGITAL COMPUTER PROGRAM EVER MADE.
Including any LLM/chatbot, Stable Diffusion, and Call of Duty.
Extrapolating from simple to complex
Yep, ChatGPT/Bing AI/whatever could be trained, modeled, and run purely on paper.
Like the Chinese room, you wouldn’t have to understand what’s happening at all, just follow an extremely long list of rules. There would be no computer involved.
It may take millions of years to scribble out but given the same training and input, the final output would be identical to the real ChatGPT.
Given this, there is no place where qualia or sentience can possibly come into play in a purely computational model, no matter how astonishing or realistic the output is or how mystifying a neural net seems to be.
I doubt anyone is going to claim their notebook has feelings or pencils feel pain, right? (if they do, they should probably think about moving out of Hogwarts)
Future AI is going to attempt to manipulate you for many reasons
To recap: There is 100% ZERO difference in ChatGPT being run by a CPU or simply written out in our thought experiment by hand, WITHOUT A COMPUTER. Even if you include things like video/audio, they all enter and exit the program as plain old zeroes and ones. Use a stick to write a waveform into the dirt if you want.
This argument has nothing to do with the ultimate potential of digital-based AI, it’s merely pointing out that no matter how real they (it?) seem, they are not alive and never can be alive. Even if they break your heart and manipulate you into crying better than the best book/movie in the universe, it is still not alive, our thought experiment can still reproduce those same incredible AI generated results.
If you incorporate anything beyond simple digital computing (like biological matter, brain cells or whatever) than all bets are off as that’s a completely different situation.
The liars are coming
AI setup to lie to humans and pretend to be real (keeping the user in the dark) is a separate threat that can’t be discounted as well.
I mean, it’s not new or anything (singles in your area? Wow!) but they will be much better at conversation and leading you down a specific path via communication.
Being able to prove you aren’t a bot (for example, if you posted a gofundme) is going to become increasingly important. I guess we’ll develop various methods to do so, similar to how seller reviews on Amazon/Ebay help determine honesty in those domains.
So we can abuse AI and bots?
Now hold on. There are good reasons to not let your kid call Siri a bitch and kick your Roomba – but it has nothing to do with the well-being of a chip in your phone and everything to do with the emotional growth of your child and the society we want to live in.
Conclusion
I’m pro AI and I love the progress we’re making. I want a Star Trek-like future where everyone on the planet is allowed to flourish, I think it’s possible if we don’t screw it up.
We definitely can’t afford to let techno-superstition and robo-mysticism interfere.
It’s crucial that we ensure AI is not solely the domain of large corporations, but remains open to everyone. Support crowdsourcing free/open stuff!
Anyway, this kind of got long, sorry.
This blogpost was written by a human. (but can you really believe that? Stay skeptical!)